Beautiful work Bob
You've definitely got the hang of the barrel stuff.
How are you doing the slotted, angled ports?


Beautiful work Bob
You've definitely got the hang of the barrel stuff.
How are you doing the slotted, angled ports?
Sean

I got the main fitting of the stock done today.... When I ordered the Boyd's Blaster stock from Norm at Discos-R-Us I wasn't sure what I was going to use it for, so I had it inletted for a Disco without gauge.... I had to modify the inletting slightly for the MRod trigger, and I used a 1" Forstner bit to drill the gauge hole.... I also had to grind a small groove in the top left side to accomodate the Foster QD fitting.... The Challenger trigger guard came too close to my fingers on the pistol grip, so I had to shorten it a bit.... Fortunately, it doesn't have a "back end" so that wasn't a problem.... I've cut off the forearm off to make the pump handle, but haven't cut the groove yet for the pump linkage....
The other thing on today's agenda was to make the barrel bands.... The front one (right in the photo) fits on the 5/8" stub on the front of the front pivot block, so the outside of the band is the same diameter as the OD of the main tube.... The rear barrel band is designed to sit immediately in front of the gauge, and clamp the front of the breech in place for extra stability....
The Crosman steel breech's main weakness is the 4-48 screw in the loading port.... There is nothing forward of that to hold the breech and barrel in place.... I would have had the band right up against the front of the breech, but because of my oversized gauge mount I had to have a 1/4" gap between the band and the breech.... The band is made in two parts, the lower one will stay on the main tube, located with a set screw.... The upper half will sit on the barrel, just in front of the breech.... You remove the two clamping screws to remove the barrel and breech from the gun.... When you replace the breech and tighten the screws, it pulls down on the barrel, clamping the front of the breech securely against the main tube.... The top of the barrel band is flush with the top of the breech....
The only major jobs left are to cut the slot in the forearm for the pump linkage and make the .25 cal extended probe bolt.... With a little luck I'll get those done tomorrow and then I can give the stock a final sanding and start finishing it with Watco Danish Oil.... This thing isn't far from initial testing.... I just need Lloyd's MRod trigger shim....
Sean, I use a 3/16" mill straight in, followed by a 5/16" mill for the transfer port flat.... I then countersink the barrel port to the (slightly larger) diameter of the transfer port.... I move the barrel forward slightly using the crossfeed and run the mill in level with the back of the round countersink mark.... I then rotate the milling attachment to about 35-40* (it stays at the same height, so no additional setup there).... I then move the crossfeed so that the back of the mill is just tickling the back of the port and mill in on an angle forward.... The length of the transfer port ends up the diameter of the mill at the angle I set it at, at the TP flat.... and longer than that inside the bore because of the angle.... It seems to work pretty good, giving a bigger port area than you can achieve with a round port of 75% of the bore diameter.... Similar to what we discussed for the .224 cal Bench Rest rifle.... BTW, that reminds me.... *grin*....
Bob
Dominion Marksman Silver Shield - 5890 x 6000 in 1976, and downhill ever since!
Airsonal: Too many to count!
Yup you guessed it...that's exactly what I was driving at.Originally Posted by rsterne

My mill is NOT user friendly to rotate the head. And I've been waiting for the Mrs...and now the wee miss to leave me alone for the 4 or 5 hours I need to figure out that tricky setup. Other than that they have been completely finished for weeks.
Sean
You mean there is actually a job that is EASIER on a millnig attachment on a lathe?.... If you can't rotate the head, can you rotate the vise the barrel is in?.... That's basically what I'm doing....
Bob
Dominion Marksman Silver Shield - 5890 x 6000 in 1976, and downhill ever since!
Airsonal: Too many to count!
Yessir...with a sine plate and a whole bunch of clamping. I think tomorrow is my day.
Anyone who has ever spent any time with a sine plate might agree they can be a fickle friend.
So ya I'd say your light years ahead of me
Sean
I tethered my "Millenium Pumper" today, running it regulated at 2000 psi to find out what it can do.... How does over 1000 fps with JSB 25.4 gr. Kings sound (over 57FPE) ?.... I initially set the hammer travel plunger flush with the end of the hammer, which gives me a travel of about 0.6", roughly the same as a stock Disco.... I can increase the travel 5 turns (24 TPI) or about 0.2" from there.... I ran through the entire range of RVA travel from coil bind out 12 turns (16 TPI) which is 0.75" of preload adjustment.... I then increased the travel 3 turns (0.125") and repeated the procedure.... Here are the results....
First comment is that coil bind occurs 2 turns further out on the RVA with the additional 1/8" of hammer travel, which makes perfect sense.... I noticed that at high preload the increased travel actually lost a few fps, and I was wondering if the outside rim of the hammer was hitting the valve, limiting the lift in that situation.... I selected three different RVA settings, and ran the hammer travel through it's range to find out, with the following results....
4 turns out on the RVA is the most preload I can use that will not cause the spring to go coil bound with the maximum hammer travel (5 turns).... You will note that there is a small but definite LOSS in velocity with increased travel.... At 9 turns out, the velocity increases as you increase travel, reaching a peak at 4 turns, and then drops.... At 12 turns out (minimum preload), the velocity increases steeply as the travel increases.... That is as per the expected behaviour, as not only does this style travel adjuster increase the travel, but as the preload is constant, it also increases the cocked spring force, so with light preloads, you're getting twice the bang for the buck, and power increases steeply....
For both the 4 turn and 9 turn out RVA settings, there is a downturn in velocity at 4 turns out.... My assumption is that is the point where the outer rim of the hammer is hitting the back of the valve, limiting valve lift.... It would appear, therefore, that is the maximum travel the gun can make use of without further modifying the back of the valve to allow the momentum of the hammer to carry it further.... Is this worth doing?.... Considering I will never run the gun at those high power levels, probably not.... The efficiency would be terrible at the long dwells associated with that much lift.... At 2000 psi, I would likely not run this gun at over 950 fps even if it was tethered.... That means at least 9 turns out on the RVA at minimum hammer travel, even less if the travel is increased.... A good solution, at least for further testing, would seem to be to set the travel at 4 turns, giving a hammer travel of about 0.77".... This will result in very low preload on the hammer spring.... I may well need to try a shorter and/or weaker spring as I'm running out of room to decrease the preload to allow tuning the gun.... This problem will increase at lower pressures....
I'm going to have to ponder these results for a while to decide where to go from here.... I'll probably do some testing at 1600 psi to accumulate more information before making any changes....
Bob
Dominion Marksman Silver Shield - 5890 x 6000 in 1976, and downhill ever since!
Airsonal: Too many to count!
I did some experimenting at 1550 psi (couldn't be bothered resetting the reg to 1600).... I had to swap out the QB hammer spring for a weaker one as I couldn't dial it to a light enough hit.... The new spring is 2.0" long made from 0.045" wire.... I tried three different stroke lengths, with the following results....
What is interesting is that at maximum stroke, the velocity DROPS as you increase the preload to maximum.... The only thing I can think of is that the hammer is hitting the valve with enough force (less air pressure, remember) to rebound off it, shortening the dwell and reducing the velocity.... At one turn out from maximum stroke, the velocity has it's normal "plateau" or nearly so, and since I am going to be detuning the spring preload the hammer should never come in contact with the valve.... so that is the setting I used for the remainer of the testing....
I filled the gun to 1600 psi and bled and disconnected the fill whip so that the gun was operating on only the 28.5 cc of air inside the valve for the next tests.... The maximum velocity for a single shot at that pressure was 922 fps (48.0 FPE) with the 25.4 gr. JSB Kings.... That compares to 836 fps (39.4 FPE) at 1500 psi with the previous Carbine pumper I built recently.... so I've picked up over 20% in FPE with the longer barrel, bigger valve, larger ports, and a 100 psi increase in pressure.... I didn't spend much time trying for a two-shot setup, but I did manage 2 shots within 5% averaging 44 FPE at an efficiency of 1.0 FPE/CI.... I did play around until I got a good 3-shot tune at 38 FPE (808/834/813 fps) with an efficiency of 1.21 FPE/ CI.... That compares to the 3-shot tune at 31 FPE with the Carbine at 1400 psi with an efficiency of 1.10 FPE/CI....
I then filled the gun to 1800 psi and repeated the above procedure.... I never tried for maximum velocity, but I got 2 shots at 45 FPE with an efficiency of 1.00 FPE/CI.... and a 3-shot tune of just over 40 FPE (835/868/840) with an efficiency of 1.13 FPE/CI.... Those three shots used exactly half of the air in the valve, the ending pressure was 900 psi.... The setting required was about 4 turns out from coil bound with the 2.00 " x 0.045" wire spring, and the travel was 1 turn less than maximum....
Considering these are just preliminary results, I'm very pleased.... I have no idea yet how many pumps (or how hard) it will be to get to 1800 psi.... but based on the extra leverage the effort should actually be less than to reach 1500 with the Carbine.... I've won't be doing any pumping until the stock is finished and installed, which is 4 more days of oiling and sanding....
Bob
Dominion Marksman Silver Shield - 5890 x 6000 in 1976, and downhill ever since!
Airsonal: Too many to count!
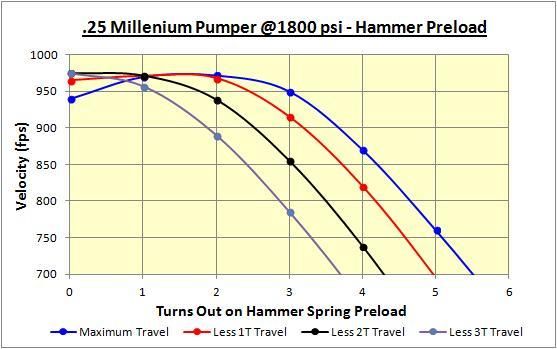
I measured the pump leverage on the extended Billet linkage compared to the stock linkage I used on the Carbine.... When you measure from the main pivot to the center of your hand, the new gun is 16.5" compared to 12.5" on the Carbine.... Since the pump stroke is the same (and the link pivot in the same place), that means this rifle should require the same effort at 2000 psi as the Carbine did at 1500.... The 3-shot tune I had on the Carbine started at 1400 psi, so I decided to tune this gun for a 3-shot string at 1800 psi.... Once I made that decision, and based on the previous testing, I went through a series of RVA settings at various hammer stroke lengths at 1800 psi to develop a baseline....
I observed the same strange behaviour as previously at maximum hammer travel, so I took some measurements.... It turns out that when the hammer is adjusted for maximum stroke length, it can only open the valve 0.10" before it hits the back of the valve body.... Under normal operating conditions, this is not an issue, but a combination of maximum hammer stroke plus maximum hammer spring preload causes this collision to reduce the dwell, and hence the velocity.... However, since I would never run this gun at over about 950 fps (wasteful of air) I can run the maximum hammer stroke without a problem.... Each turn less on hammer stroke requires about a half turn more preload on the spring.... This increases the cocking effort and the load on the sear, and is likely to increase the possibility of hammer bounce.... so I maxed out the hammer stroke (to minimize the preload) and started looking for suitable tunes....
I wanted three tunes, one with a single shot at high power without wasting too much air.... a second one where you had two shots of equal velocity.... and the main one I was interested in, a 3-shot tune where the three shots were within a 4% maximum ES.... Here are the results, using 25.4 gr. JSB Kings....
The graph shows the velocity of the following shots so you can see what is happening.... The single high power shot worked out to 951 fps (51 FPE) and used 500 psi of air (0.85 FPE/CI).... The 2-shot string was 898 fps (45+ FPE) and used 730 psi (1.04 FPE/CI).... The 3-shot string averaged 846 fps (40+ FPE) and used 900 psi (1.12 FPE/CI).... If you needed a 4th shot, it would be about 725 fps (30 FPE), plenty good enough for a close follow-up or Coup de Gras....
How does this compare with the Carbine I built previously?.... That gun maxed out at 837 fps (40 FPE) for a single shot, delivered two at 796 fps (36 FPE) , or three shots at 739 fps (31 FPE).... so I've picked up about 100 fps and 10 FPE across the board.... To say I'm pleased would be an understatement.... Another couple of days of oiling and sanding the stock and I'll be able to try pumping this beast....
Bob
Dominion Marksman Silver Shield - 5890 x 6000 in 1976, and downhill ever since!
Airsonal: Too many to count!
OK, OK, the lightbulb just went on.... The downturn of the maximum travel curves at maximum preload is the "bstaley" effect showing up.... I was just slow to recognize it.... I was thinking of it backwards.... Once you run enough preload it is possible to drive the hammer into the back of the valve IF the stroke adjuster is fully inside the hammer (maximum throw).... Here is the data replotted for the maximum preload with the 2.00" x 0.045" spring at coil bind....
What is happening is that if the center of the hammer face (the striker part) is recessed as far as it can go, it is limiting the valve lift to 0.100".... That is what is happening at the "Maximum" setting in the above graph.... As you move the striker forward (towards the hammer face) it opens the valve further (eg. at 1 turn).... At 2 or more turns, the hammer is no longer hitting the valve body, so the velocity limits at it's usual "plateau" like I'm used to seeing.... If I continued reducing the recess in the front of the hammer (which also reduces hammer throw) I would again see a velocity loss....
I'm going to have to ponder this for a while....
Bob
Dominion Marksman Silver Shield - 5890 x 6000 in 1976, and downhill ever since!
Airsonal: Too many to count!
Hmmm
Your thinking that the hammer is crashing into the valve with enough momentum that its being forcibly repelled? Or am I missing it?
Sean
 Posting Permissions
 Reply With Quote