


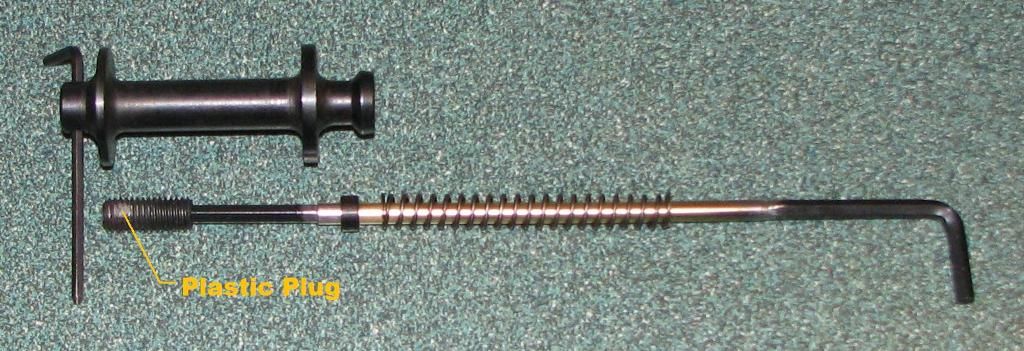
I pulled the gun apart tonight and fixed the problem of the hammer preload screw moving.... I drilled a 1/8" hole about half way through and drove in a Delrin pin and then shaved it off flush with the top of the threads and screwed it in.... It was a bit too tight, but a little shaving with a razor blade and now it's nice and snug but you can adjust it when you want to.... Here is a photo of the hammer and the two allen keys to adjust and hold it.... There is a spacer between the screw and the spring, and it and the hammer spring are sitting on the long allen key I made....
I also pulled out the brass sleeve that the valve screws into and checked to see how it lined up with the holes in the valve.... It was just a fraction off lining up with one of the holes, so I machined 0.001" off the end so that when screwed in, one hole lines up perfectly with the transfer port.... The sleeve barely comes flush with the end of the main tube, so if you had to machine off more (0.010" would index the valve about 1 hole) you might also have to machine a small amount off the end of the main tube as well.... I added a punch mark to identify the top hole in the valve.... I also noted that the annular groove in the valve is narrower than the transfer port where the circle is on the photo....
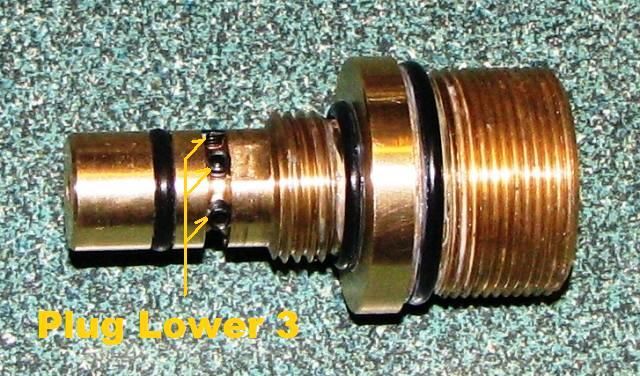
Previous experimenting by others on the AT44 showed that plugging the lower three holes has little affect on velocity and reduces air use, thereby increasing efficiency.... I disassembled the valve, tapped the bottom three holes 6-32 (no drilling needed, they are the right size) and installed 3/16" long SHSSs flush with the outer (and inner) surface of the valve.... This not only blocks the holes, but helps reduce the volume of the groove.... If it proves to be the right thing to do, I will fill the remainder of the groove between the screws with JB weld to further reduce the volume....
I put a slight bevel on the edges of the groove to fair it into the transfer port.... I will likely be drilling out the top hole to the same size as the TP (0.172") once I have tested this stage.... I may also be plugging the remaining two side holes as well.... that proved to be the best, when used in conjuction with the larger top hole in the .22 cal I worked on....
The next step is to reassamble the rifle and test it with the lower 3 holes plugged to check the velocity and efficiency, and what hammer preload adjustment has to be made to compensate....
Note to Sean RE the valve threads.... The OD of the threads is 1.080" and the OD of the main tube in that area is 1.202" so the maximum wall thickness above the threads is 0.061" (and it's probably a whisker smaller than that).... The very end of the tube where the O-ring seals is 1.150" ID, so the wall thickness above the O-ring is only 0.026".... I don't even want to think about that.... I guess it works because it's a very short length at that size?....
Bob


 Reply With Quote