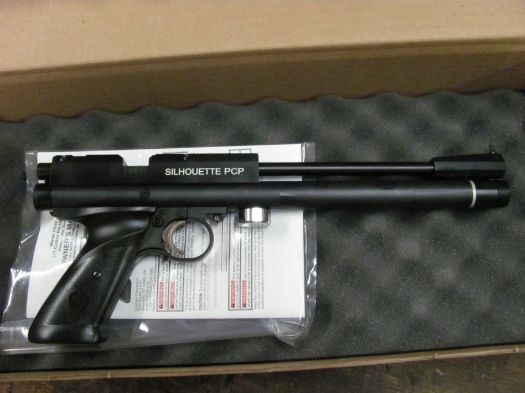
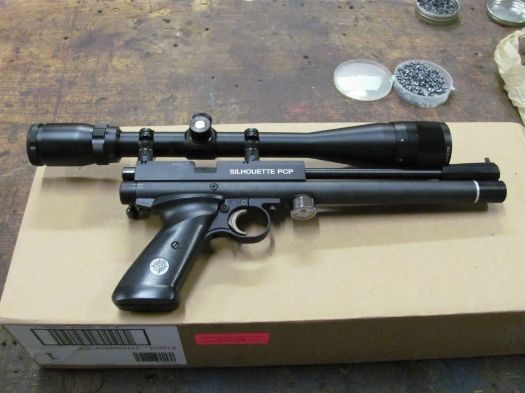
ScopesAndAmmo.com Store Logo

+ Reply to Thread
Page 1 of 2 12 LastLast
Results 1 to 10 of 19

Thread: 1701 p

  1. #1
    Senior Member Doc Sharptail's Avatar
    Join Date
    Sun Jan 1 2012
    Location
    Up The Escarpment
    Posts
    320

    1701 p

    It's here!

    Not much time before out the door to work.

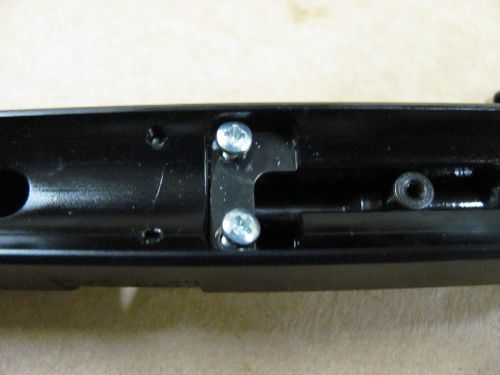
    I am impressed. Only dis-appointment is the loose grips. Gun is packed with a lot of improvements that shooters have been doing on their own over the years, with a new wrinkle or two thrown in for good measure. I'll have a lot more on this later... very excited!

    Regards,

    Doc Sharptail
    "Ain't No Half Way"

    -S.R.V.

  2. #2
    Senior Member sholo's Avatar
    Join Date
    Sun Jan 1 2012
    Location
    Slightly north of "out there"
    Posts
    354
    Congrats, Doc!...You're gonna love that trigger.

    Looking forward to your review...and the obligatory pics of course!


    Cheers,
    Todd
    Todd

    Don't sweat the petty things, and don't pet the sweatty things!

  3. #3
    Senior Member Doc Sharptail's Avatar
    Join Date
    Sun Jan 1 2012
    Location
    Up The Escarpment
    Posts
    320
    This pistol is INSANELY ACCURATE!!!
    ...Had to get that out of my system. It's a heady elixir, alright....

    Todd: Yeah, the trigger's a beaut. It's a true 2-stage, with excellent control.

    A big thanks to Eric for getting this off to me as quick as he did. Much appreciated. You've earned my repeat business once again!

    More in a bit- Norton just expired...
    "Ain't No Half Way"

    -S.R.V.

  4. #4
    Senior Member Doc Sharptail's Avatar
    Join Date
    Sun Jan 1 2012
    Location
    Up The Escarpment
    Posts
    320
    ...obligatory pictures Indeed. The photos help me get across what I want to say- thought patterns are a lot more organized that way. And, no, I don't think I'm crazy, or defective- just a very old trick I learned writing papers in University daze. Visualization leads to proper communication.

    With that in mind:


    The two holes closest to the center of the "x" are RWS Meisters. Hole at left is 5 of them, hole at right is 10. Shot at 12 meters from a cardboard box rest under the front of the tube. 2400 psi. Amazing- despite the loose and wonky grips, and the tendency of the tube to roll/slide across the rest... other holes are sighters, getting the 6-24X Banner lined up....


    Pistol as shipped.


    Benjamin labeled gauge. Gun shipped with about 350 psi in the tube.


    That hole in the rear end cap is for access to the hammer spring adjuster, and for the hammer strike adjuster. I haven't disturbed either (yet).


    There's the long (extended?) probe...

    I'll have more to follow- I'm kind of wiped from the excitement right now. If you ever get the chance at one of these, grab it...

    Regards,

    Doc Sharptail
    "Ain't No Half Way"

    -S.R.V.

  5. #5
    Senior Member Doc Sharptail's Avatar
    Join Date
    Sun Jan 1 2012
    Location
    Up The Escarpment
    Posts
    320
    Pistol is well put together. The absence of flat head screws on the breech and grip frame are a welcome change. I have always liked the socket hex-heads better. Only flat head screws are the grip screws. For a 400.00 + pistol, you'd think they'd find a way to improve the grips.

    I like the gauge a lot. It has increments of 200 psi from 0-3000 psi. I think this is gonna be my go-to gauge for experimental/work-up purposes.


    Male foster fitting appears to be sealed with some type of silicate gel. I'll need to find out more about this.


    Fill adapter has a ceramic type filter built into it- much like the Carter style fuel filters G.M. used to use so long ago. Correct me if I'm wrong- this one looks like it will stop water....


    A 9/16" spanner is required to remove the aluminum fill adapter. There is a slight shoulder inside the tube for the O-ring to seal up against.


    The inside of the tube. Gun shipped seriously over-lubed. I had to use a 12 bore patch 3 times to get the excess oil out of the tube. It's become a habit with me to check the internals of an air gun before shooting it for the first time.


    Looking just a little improbable with the big 6-24X Banner aboard. What can I say. As pictured, it produced the groups shown above. Objective bell clears the muzzle brake by about 1/32"

    Bolt closes hard over just about every pellet I've tried. By the way the gun shoots, I doubt if the bbl leade is cutting the pellets. It appears that the tight lead-in to the rifling is swaging the skirts to size. I'm not so sure I want to interfere with that. The bbl doesn't like the 10.3 gr Cr Ultra Magnums. I could not get them to group at all. Looks like I'll have to go to JSB, or H&N for a heavy for caliber pellet. The Meisters seem to load okay- no problem giving the pellet a little wiggle so the head will enter straight. Bolt still closes hard over the skirt.

    I couldn't find any markings on the bbl to identify it as a L/W. At first glance, it looks like any other Crosman XX bbl. Maybe removing the bbl from the breech will expose a mark of some kind.
    I have to investigate finding these in a 24" length...

    Breech appears to sit solidly on the tube, and there's no bbl movement at all.

    Hoping to get the gun over the chrony tonight...

    Regards,

    Doc Sharptail
    "Ain't No Half Way"

    -S.R.V.

  6. #6
    Senior Member sholo's Avatar
    Join Date
    Sun Jan 1 2012
    Location
    Slightly north of "out there"
    Posts
    354
    That thing IS wickedly accurate, isn't it?... Nice shootin'!

    Fill adapter looks the same as the Disco ones I use other than the Disco adapter is a bit longer (two o-rings instead of one). Yours would allow for a bit more air volume - handy to have with a short tube. How long is the tube, btw?

    Correct me if I'm wrong- this one looks like it will stop water....
    LOL...Mine are the same. When I got my first one I thought the same thing so I put it up to my lips and blew through the Foster fitting....you can do it, but it's slooooooww!

    I agree 100% with you on the Benjamin gauge...
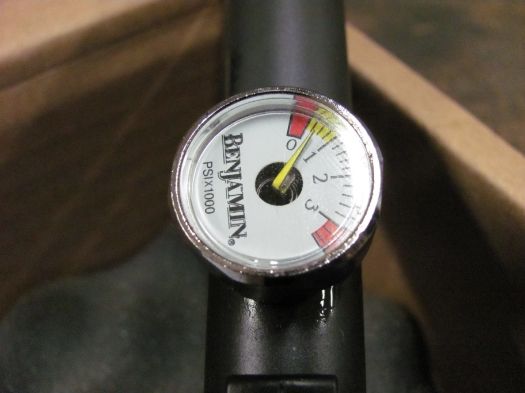
. I just got one from Eric for my next project and I'm already liking it more than the the Disco gauge - and I haven't even had air in it yet!

    Never realized before that the 1701P had the bolt handle on the left...Nice!!


    Cheers,
    Todd
    Todd

    Don't sweat the petty things, and don't pet the sweatty things!

  7. #7
    Member Gippeto's Avatar
    Join Date
    Sun Jan 1 2012
    Posts
    208
    Nice shooting.

    Wondering if you're using the 7.0 gr or 8.2 gr Meisterkugeln? Need to order pellets fairly soon and would like add a tin of whatever you're using.

    Thanks,

    Al

  8. #8
    Senior Member Doc Sharptail's Avatar
    Join Date
    Sun Jan 1 2012
    Location
    Up The Escarpment
    Posts
    320
    Al: they are the 8.2 gr in the Yellow 500 count tin. Got 'em on clearance at S.I.R. just after the Cabela's take-over. Paid 9 bucks for that tin.

    Todd:

    The bolt is ambidexterous- take the breech off the tube, remove the hex-head cocking pin catch from the bolt, rotate the bolt shaft 180, and re-install the cocking pin catch. Undo the two phillips head screws, and turn over the bolt stop plate, re-fasten, and you are done. Gonna up-load some more pix, and a chrony report to follow...

    Regards,

    Doc Sharptail
    "Ain't No Half Way"

    -S.R.V.

  9. #9
    Senior Member Doc Sharptail's Avatar
    Join Date
    Sun Jan 1 2012
    Location
    Up The Escarpment
    Posts
    320
    Chrony report:

    Please bear with all the numbers. I'm not all that tech-savvy to begin with, and some aspects of this o.s. have me pretty well flummoxed.

    Gun has a very gentle curve to it, just barely perceptible over the first 30 shots or so...

    Crosman 7.9 gr "milk carton" field/hunting points (Just because they are easy loading in the 1701-P) at 2500 psi on both the hill and benji gauges.

    1.) 472.0

    2.) 476.1

    3.) 470.1

    4.) 474.2

    5.) 477.3

    6.) 478.1

    7.) 479.3

    8.) 485.4

    9.) 483.0

    10.) 469.8

    11.) 481.9

    12.) 483.0

    13.) 483.4

    14.) 482.0

    15.) 484.0

    16.) 481.4

    17.) 485.1

    18.) 478.2

    19.) 477.8

    20.) 483.1

    21.) 482.0

    22.) 476.2

    23.) 481.2

    24.) 474.8

    25.) 476.4

    26.) 476.1

    27.) err-2

    28.) 477.9

    29.) 473.3

    30.) 470.6

    31.) 474.1

    31 shots used 500 psi according to the gauge on the gun. 40 shots used 700
    psi, and 50 used 900 psi.

    Actual steady velocity drop started at shot # 37- it dropped to below 470, and took 13 shots to get to 449 fps. Test halted at 50 shots... there was little point in going further.

    Regards,

    Doc Sharptail
    "Ain't No Half Way"

    -S.R.V.

  10. #10
    Senior Member Doc Sharptail's Avatar
    Join Date
    Sun Jan 1 2012
    Location
    Up The Escarpment
    Posts
    320
    I had the top end of the pistol apart tonight. I wanted to put the bolt on the right-hand side of the gun. It shipped set up for A.P. Sihlouette (whatever that is) with the bolt on the left hand side.

    The bottom of the breech was absolutely drenched in oil. As a matter of fact, I gained 15 fps by cleaning the oil away- the breech bolted up 2 or 3 thou tighter with the oil out of the way.


    Transfer port as it was on removing the breech. Everything's slicked up good and wet with oil.


    Milled inlet on the valve exhaust side. Nicely done. Exhaust hole is pretty tiny.


    Hi-Hat transfer port. Incompatible with 22-XX without modifications. It takes a transfer port seal on both ends. Flow hole diameter is very close to 1/16".

    Bolt and Barrel seal is different on this gun as well. I'm pretty sure that milled step into the leade on the L/W bbl is for the breech seal to compress against.... The 1701's bbl has a flat milled into it to make a seal against the top transfer port seal- rather than the inverse cone of the XX bbls.

    I have yet to make adjustments of any kind to the pistol. The hammer spring and hammer strike adjustments are an intriguing concept to me. How much effect they would have with that tiny flow-hole in the transfer port remains to be seen.

    Here's a look at the bolt arrangement:


    Set up for L/H with the bolt stop screws removed.


    Set up for right hand, with the bolt turned 180 degrees from the L/H position, and the bolt stop plate turned over, with it's screws ready for tightening.

    After all is said and done, I'm highly impressed with this pistol. I like the breech with it's 4 hex head socket retaining screws. The matte finish on the tube takes a bit of getting used to. Cocking effort is surprisingly heavy, for a gun with such low intensity. I like the high shot count. The front sight is as nice as I've ever seen, with it's simple width adjustment. I'd like to try a peep rear with it.

    In the future, I can see some kind of a fore-grip for it-be it p-rod, or other wise. I hope to get a 24" .177 bbl for it somehow- just to see how it does riflized....

    Regards,

    Doc Sharptail
    Last edited by Doc Sharptail; Jun 13 2013 at 04:24 AM.
    "Ain't No Half Way"

    -S.R.V.

+ Reply to Thread

Posting Permissions

  • You may not post new threads
  • You may not post replies
  • You may not post attachments
  • You may not edit your posts